
It’s been a long time without writing article.
One of the most popular one was related to Raspberry and Digi_Ned digipeater software. The last step with Digi_Ned modifications was not published and this frustrates lot of people.
To repair this, I reworked on a brand new solution which can be used with old or new Raspberry Pi models. The one I used is the Model B which is now quite old. But it’s working fine.
As the TNC-Pi from Costal Chipworks is not sold anymore, I had to find a new solution and the “Nino-TNC” is the best way I found. You buy the PCB and the PIC in Etsy, then you buy the parts on Mouser. A BOM (bill of material) is provided on the Nino-TNC website, and you just have to import it in the Mouser website.
Once you have all in hands, 2 hours are required to solder 2 units (and I’m really not a professionnal “solderer” !). It’s easy and all steps are well detailed on the website.
Initial setup
Install the OS using the Raspberry Pi Imager software (https://www.raspberrypi.com/software/). Raspberry Pi OS version 11 (bullseye) was used in this example. The initial configuration steps will not be detailed here.
Start by upgrading your raspberry with the last available packages with the command
> sudo apt update && sudo apt upgrade

> depends when you are doing the update there is more or less packages to install. Validate with « yes »

> once completed, restart your system with « sudo reboot »
Ensure your system is starting in console mode (non GUI) :
> sudo raspi-config
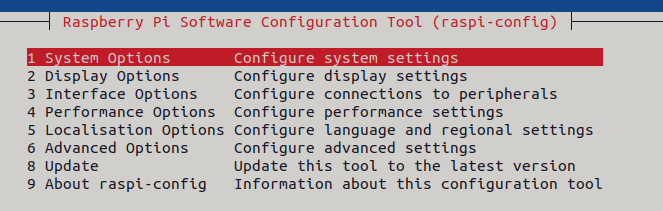
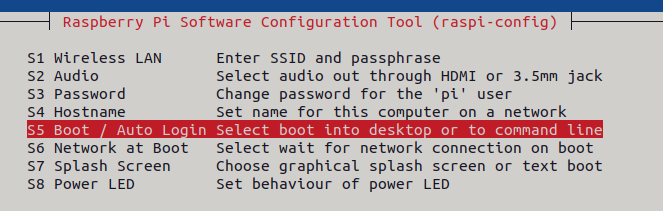

>Wait few seconds for the change to be applied. When the menu comes back, exit with Escape key.
AX25 Tools : Install & Configure
Install AX25 tools and library devices :
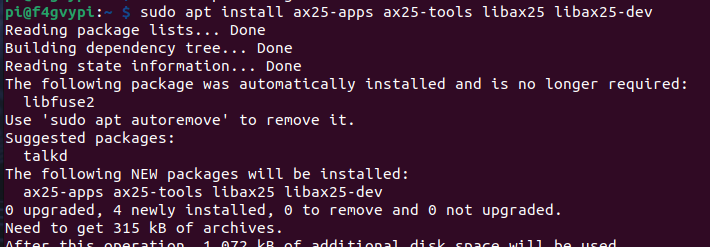
> sudo apt install ax25-apps ax25-tools libax25 libax25-dev
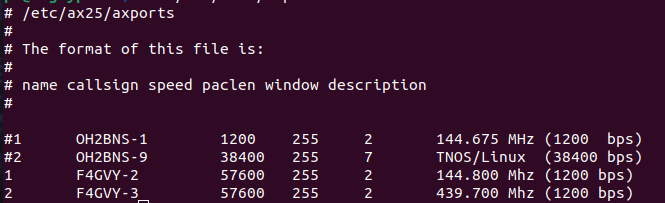
> In the file /etc/ax25/axports : Define the name of your interfaces with the baudrates that will be used to communicate with the interface. You need to specify two different callsign even if you are going yo use only one. The NinoTNC is using 57600bps.
First run of NinoTNC
Connect your NinoTNC to a USB port.

> Run « dmesg » to check if the raspberry detected it. The TNC was detect and the serial line is /dev/ttyACM0 (ACM number can change when there is multiple TNC devices connected. The device address is : ‘cdc_acm 1-1.2:1.0’, this address is the physical port and will never change for the same USB Port.
> The ACM pseudo-device is created and a symlink to USB Path is also created : /dev/serial/by-path/platform-20980000.usb-usb-0:1.2:1.0


> For the test we will use the native pty pseudo-device (/dev/ttyACM0 in my capture). The tool kissattach is used to map the USB device to a network interface created on the system. Run kissattach as shown in the capture to link your physical device with the logical AX25 port.
The network device « ax0 » (ax1 for the seconde one…) is created and is using the TNC as a network adapter. If you are using more than one TNC
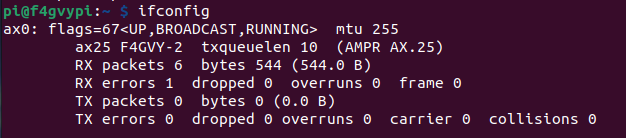
> The command « ifconfig » will show you the interface created. If your TNC is already connected and receive APRS trafic, you should see the « RX packets » counter increasing if you re-run the command « ifconfig » later.


> You can monitor the received frames with the command : « sudo /usr/bin/axlisten -c -a ». This will display the decoded frames. If you don’t see any trafic appearing here, you have an issue with the TNC, or the way it is receiving audio from your radio.
*** At this point, your NinoTNC is working and you can use any application that will use ax25 to communicate.
Usage of DIGI_NED
The instructions are the same whenever you are using a classic computer (intel architecture) or a raspberry Pi (ARM). The only difference will be the source files you will be using.
Download the source files from PE1MEW website (http://digined.pe1mew.nl/?Download):
* For classic Linux computer : http://digined.pe1mew.nl/?download=dnsrc040.zip
* For Raspberry PI a modified software can be downloaded here : https://github.com/jmalghem/digi_ned-raspberry/archive/refs/heads/main.zip
GitHub repository : https://github.com/jmalghem/digi_ned-raspberry
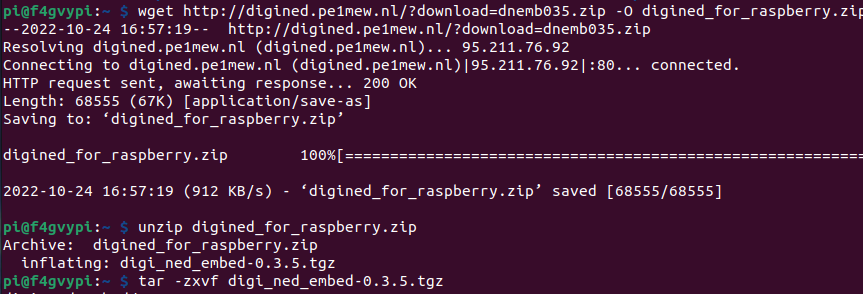
> Download your version of digi_ned with wget / unzip / tar
> Go to the created folder and run the « make » command to compile the source code.
> Change digi_ned.ini with your configuration (callsign, digi dest, location, …), digibcon.ini, digi_id.ini
> Start your digipeater with the command : ./digi_ned -p 1 -p 2 -v
>> Observe the messages returned by digi_ned program to find any issue in your configuration. If all is OK, your digipeater is running.
Next steps
At this point the software is configured & running. The next steps will be to create a startup script and ensure the program is restarted in case of crash or restart.
These steps will be detailed later in another article.
References
- Nino-TNC (http://tarpn.net/t/nino-tnc/nino-tnc.html) : Hardware module used as a KISS TNC Modem connected to the Raspberry.
- Mouser (https://eu.mouser.com/) : Order part for the Nino-TNC by importing the Excel sheet provided on Tarpn Web site.
- Digi_Ned (http://digined.pe1mew.nl/) : The famous digipeater developped by PE1MEW & PE1DNN
- Raspberry Pi Os (https://www.raspberrypi.com/software/) : Software to download and flash your SD card.
Bonjour
Impossible de commander 2 cartes Nino TNC sur le site ETSY car pas de livraison en France.
Avez vous une solution.
Cordiales 73
thank you. I anticipate the next article with startup script creation.
Le nino TNC pas forcément détecté sur un raspberry:
J’ai acheté un Pi4 8GB de mémoire. J’ai galéré longtemps car le nino TNC n’est pas reconnu si on le branche en USB sur le Pi4 directement sans hub USB.
Avec la commande lsusb, pas moyen de le repérer. Il m’a fallu le brancher via un hub USB de puissance, c’est à dire qui naliment le nino TNC, et non pas le Pi4 qui alimente en 5V le nino TNC.
Pour un montage allégé, il faut donc prévoir d’amener du +5V firectement sur le nino TNC en plus des autres cables. Cela ne semble pas prévu par les constructeurs. Le problème est résolu si on enfiche le nino TNC directement sur un raspberry.